ChargeMaster/Polar/Brtish Gas
EVSE Plug/Cable Replacement Instructions


ChargeMaster/Polar/Brtish Gas
EVSE Plug/Cable Replacement Instructions
NOTE: Completing this procedure will almost certainly void your EVSE warranty!
Tools Required:-
2.5mm Allen key or hex driver
No 2 posidrive screwdriver
4mm Flat screwdriver (ideally electrician’s)
2mm Flat Screwdriver
Mains tester
(Possibly) 8” Adjustable spanner
1/ ISOLATE THE EVSE (charge point box) from the mains supply. Do so by switching off the mains at the relevant consumer unit (‘fuse box’). Most EVSE supplies are wired via a separate isolation switch (NOTE: This is NOT the same as an MCB or RCD or RCBO but if the relevant device is a 2 pole one then this, when ‘Off’, will effectively isolate the EVSE). If it is isolated, none of the status lights will be illuminated on the front panel.
2/ Confirm isolation from the mains by using a mains tester to MAKE SURE none of the wires to the EVSE are live (this may not be possible without first removing the EVSE front panel).
3/ Dismount the EVSE from the wall bracket by removing the screw (either posidrive or 2.5mm Torx) at bottom centre of the EVSE box…
It is easier to remove the EVSE front panel if the EVSE is disconnected from the mains supply….
3a/ Polar EVSEs are always installed with a small wiring box (about 100mm x 100mm) mounted after about a 200mm length of flexible conduit. If your remove the lid from the wiring box BEFORE DOING ANYTHING ELSE - use your mains tester to ensure there is no power on any of the wiring inside the box. ONLY THEN disconnect the supply wires to the EVSE inside the wiring box and remove the box to a desk or table top.
4/ Use a No 2 posidrive screwdriver to remove ALL the machine screws from the rear of the EVSE front panel. Note one of them has a ‘Void if Removed’ sticker on it. Do not remove this if you do not want to void your warranty!
5/ Remove the front panel and you will see it is attached by wires to the front panel status lights and power switch (amongst others). Do not pull on these or you may irreparably damage your EVSE.
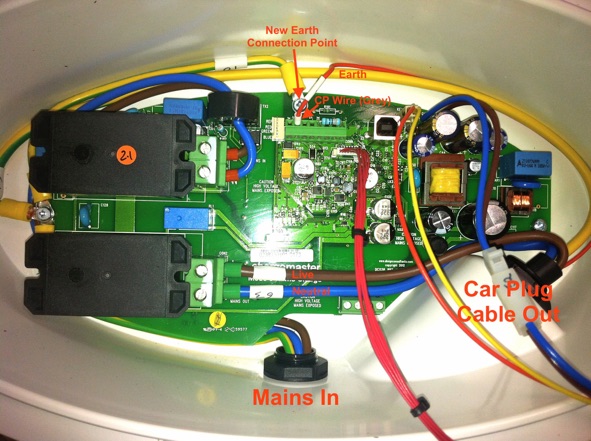
6/ The inside of the EVSE looks like this...
7/ TAKE A PHOTO of the inside of the box to allow you to check your (completed) re-wiring is correct.
8/ Slacken the gland nut on the ‘Car Plug Cable Out’ gland (the one on the outside of the EVSE box)...
9/ a/ Slacken the 'Live' and ‘Neutral’ terminals (as marked in red in the photo above) and pull the wires out.
b/ Undo the posidrive screw holding the earth wire on the far left of the photo, remove the ‘Car Plug Cable Out’ Earth wire and re-secure the other Earth terminals back to the printed circuit board (PCB) using the same screw.
c/ NOTE THE POSITION OF and then slacken the ‘CP’ wire terminal and pull out the CP wire.
10/ Gently pull the ‘Car Plug Cable Out’ cable ends out through the cable gland.
11/ Gently insert the ends of the new ‘Car Plug Cable Out’ cable. Staggering the ferruled ends of the conductors may make this easier rather than trying to do them all at once.
12/ First remove the Earth terminal posidrive screw at 12 o’clock indicated in the photo as ‘New Earth Connection Point’. Connect new ‘Car Plug Cable Out’ Earth wire to this location ensuring that the other Earth wire terminal is connected at the same time.
13/ Connect the Live, Neutral and ‘CP’ wires to their respective terminals. The Live, Neutral and Earth connections should be as tight as you can get them without allowing the screwdriver to slip on the screw-head. The new CP wire may be a different colour to the original but it will be clearly marked ‘CP’. It is ESSENTIAL that these are correct. If you mix them up you could not only damage your EVSE...
***BUT ALSO YOUR ELECTRIC VEHICLE'S CHARGER***!
14/ Tighten the ‘Car Plug Cable Out’ gland nut such that the ‘Car Plug Cable Out’ cable cannot be pulled out using reasonable hand force. The spanner may be required. It is also good practice to tightly attach a stout (at least 6mm) plastic tie to the end of the ‘Car Plug Cable Out’ cable outer sheath just inside the gland nut to help prevent the cable pulling out of the gland (not shown in the photo but would go just above the ‘g’ in the ‘Car Plug Cable Out’ red label in the photo).
15/ Replace the EVSE front panel. Do not over-tighten the screws.
16/ Re-mount the EVSE on the wall bracket.
15a/ Reconnect the mains supply wiring, if disconnected at 3a, above.
17/ Switch on the mains.
I strongly advise that after a week or so of heavy use (ie 10kWh or more of charging per day) the front cover of the EVSE be removed and the Live and Neutral connections be checked for any signs of overheating (‘sweating’ of the plastic insulation, browning or (hopefully not) charring or obvious ‘burning plastic’ smell. If any sign of this is found, check the terminal is TIGHT! Then check again after a similar period of use. If heating is still found, consider replacing the affected component and/or re-doing the connection.


NOTE: For liability reasons, I strongly urge you to undertake what follows ONLY if you are ‘suitably qualified’. If you do something silly, you could very easily DIE!!!


Contact Us...
Email: sales@EVBitz.uk - Mob: 07788 138413
2 Hall Cottage
Isle of Colonsay
Argyll
PA61 7YT
Scotland
UK Registered Private Limited Company
I am not VAT registered so ALL PRICES INCLUDE VAT!